Thursday, 19 November 2009

Organza

Here's another of Bronwyn's practice pieces. In this experiment she's used 3 layers of organza on top and one on the back with the Texture Magic sandwiched in the middle. She's stitched a variety of coin sized circular shapes. The layers on top create a depth of color. You'll see this more clearly if you click on the image for a close up view. I'm going to experiment with this technique for Valentime's Day and do hearts.
Things about Texture Magic I've learned from this project:
1.) Layers work!
2.) The larger the negative space is the more pronounced the texture. Another way of saying this is that it's the unquilted or unstitched spaces that stand out. This is such a tactile piece - everyone who's seen it just has to touch it.
3.) Funky fabrics are fun! On my own, I never would have considered organza!

Tuesday, 17 November 2009

Textile Artist

Look what happens when you turn a textile artist loose with a packet of Texture Magic. Last week I gave my friend a packet of Texture Magic so she could have a play with it. Bronwyn is a fashion designer turned textile teacher. She spent a couple of happy hours on Sunday afternoon and here is one of the pieces she came up with.

Click on the image to get a good close up look. You'll see that Bronwyn used a variety of fabrics; hand dyed cottons and netting, silk, organza and velvet. She wanted to find out how the various fabrics would respond to the shrinking process. Bronwyn also wanted to see how different stitching played out in various patterns and sizes. Note that the fabrics weren't even pieced just laid on top and next to each other. The result is stunning! And this is just the first piece. We'll look at some of the others in the next post.

Monday, 9 November 2009

The Fun Theory

I just loved this! Never underestimate joy. "In every job that must be done there is an element of fun..." When I was a kid we called this the Mary Poppins theory. It works. Do something fun today! If this takes too long to buffer, double click inside the box and it will take you to youtube. You'll see it bigger and quicker.

Tuesday, 3 November 2009

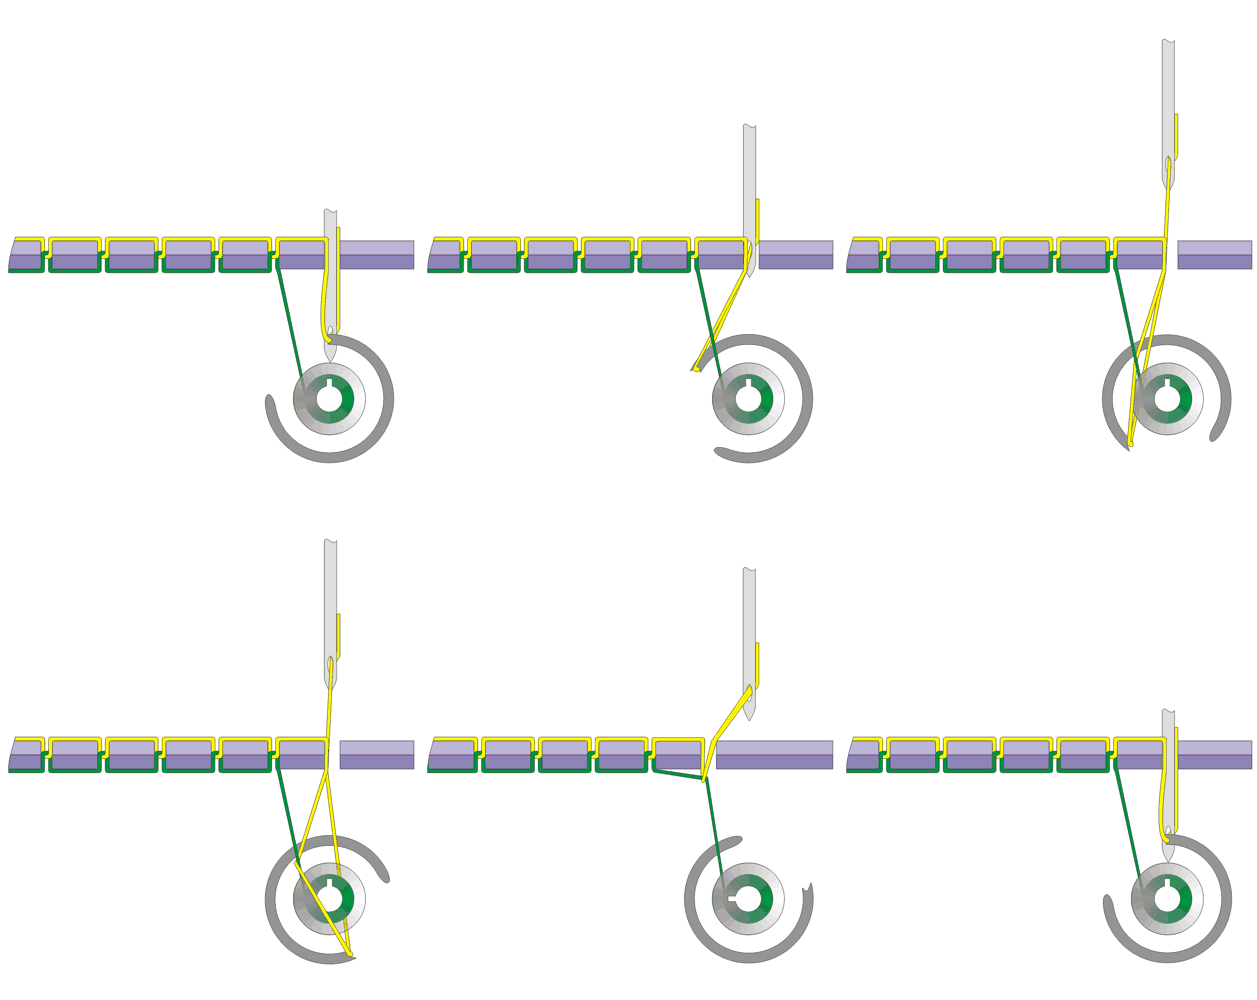
Inner Workings

This is how a sewing machine works. Wow! This moving image explains so much. It so clearly shows how the top and bobbin threads work together to make a stitch and how the wrong sort of top or bottom tension can make things go wrong. And why using the right needle and threads is so important. This image is a fantastic teaching tool for anyone working with sewing machines.

It's a Hoot!

My daughter Ellie and I found this neat owl bag when we were looking for some autumn craft ideas over the half term break. The brown owl bag comes from Ellen Baker at thelongthread.com I've added a link on the side bar so you can visit her. You can see our version just below. But the bag has morphed into snugly cover for a hot water bottle.
Hot water bottle?? Well, hot water bottles are a big deal over here in cold damp England. A hot water bottle is one of life's simple pleasures. I don't think that I ever ever used one when I lived in Baltimore but everybody uses them here, even kids. Especially if they have a soft fleecy cover!
So here's what we did. First we rummaged around my bag of left over fleece. I love working with fleece because it is so soft and cuddly, it also keeps its shape and won't unravel. I just traced around the hot water bottle and cut the front out a bit larger. The back of the cover was pieced, with an overlap, just like the back of a cushion cover. Then we put right sides together and sewed all the way around. Hey presto one hot water bottle cover.
Now for the owl. Again, using a double layer of fleece, I cut an owl shape that would cover the front, put right sides together and sewed most of the way around, leaving a gap at the bottom so I could turn it inside out. I machine stitched the gap closed - it will get covered by the feathers. We traced and cut some circles for the eyes and a triangle for the beak out of other colours of fleece and top stitched them down on the machine with some pretty variegated thread.
For the feathers, I decided to raid my stash of designer fabrics. I cut a two inch strip along a selvedge edge and cut scalloped feathers. I then turned this wrong side up in an arc and machine stitched the selvedge edge to the fleece. This hides the stitching and gives the feathers a bit of loft when they flip over. I went on to add 3 more strips of feathers in the same way. Finally, we used the buttons for the center of the eyes to attach the owl to the hot water bottle cover. This was fun and fast and now everybody wants one.
This 'Spotted Owl' fabric from Alexander Henry's In the Kitchen collection is well worth a closer look. Now that everybody in our house wants their own owl cover - we'll be needing inspiration from this Parliament of owls. As ever, a picture is worth a thousand words so click on any of the images for a good close up shot.

Monday, 2 November 2009

Directionally Challenged

Well, I am. I think that perhaps its some sort of spatial dyslexia. I've always struggled with left and right. Something only made worse by spending the last 22 years in a country where they do most things the other way round. I also struggle with following written directions. I'm much better if I can actually see someone do it. Tutorials with photos on the web are fantastic for me. Anyway, because I struggle with directions I've gotten into the habit of learning by trial and error. I'm beginning with this disclaimer because I'm going to share the process of turning my pumpkin patch Texture Magic experiment into a trick or treat bag. And I wanted you to know that I'm just figuring it out as I go along.


I've begun with 2 fat quarters of orange batik backed with Texture Magic and free-motion machine quilted with a free flowing loops and pumpkin design. It looks really cool. But I want to turn it into something useful. So I've put them right sides together and sewed around 3 of the sides. Then I've done that trick in the bottom corners where you line up the seams to make a triangle and stitch a line across. Like this:

Then I did the same thing to the lining fabric, making it just a little bit smaller. I've added a strip of yellow fabric at the top to make an edging.


And here's how it turned out. Click on this final image for a great view of the bag. I had to wait til morning so the natural-light photo could bring out the color and the texture.

Sunday, 1 November 2009

The day after


Some days are just too busy to blog. We had such fun carving pumpkins! Rosie carved this cool 'Cheshire' cat.


Peter went for the man pumpkin and used power tools! (and cookie cutters) We thought it was truly epic!


They turned out great!