Friday, 30 October 2009
All Hallow's Eve
Evil spirits prowl about
Ring the bell hear them shout.
While the moon hangs o'er the fen,
Saints and angels rise again.
Witches, goblins, demons, ghosts,
Flee before the Heavenly Hosts.
Halloween, is poised between,
Darkness and Light.
It's the night the armies fight.
a mother daughter poem 2004
Tuesday, 27 October 2009
Texture Magic Pumpkin Patch
This Pumpkin Patch design is made with Texture Magic on a table top frame. I wanted to see how a loose and flowing free-motion design would work. So I attached the Texture Magic as if it were the backing fabric and then added the orange batik fabric as the top. I've skipped the wadding for this project as the texture will come by 'magic'.
Here it is all loaded on the frame. I'm using Nile Delta from the King Tut range of Superior Threads. I love how it looks against the batik.
Here's a close up of the stitching. This is such fun to do! Just lots of loops and pumpkins in all shapes and sizes.
Then whip it off the frame and steam it. I begin with the Texture Magic side up. Then flip it over and steam it more with the fabric side up. I'm less worried about it catching the iron this way and so bits I've missed the first time continue to shrink. I've found that steaming works better if I've laid it on a towel or fleece.
Texture Magic creates quite an audience in our family with everyone gathering round to watch the 'magic'. This pumpkin patch free motion design turned out great! Click on the image for a better close-up view. We'll make it into a trick or treat bag in the next day or so.
Saturday, 24 October 2009
Stained Glass Pumpkins
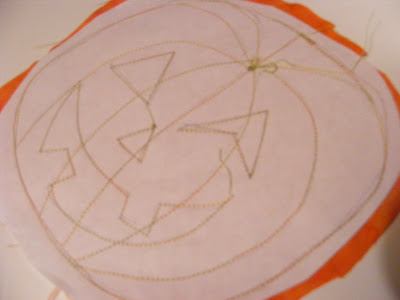
They're called Stained Glass Pumpkins because we hang them in the window and the sun shines through so they glow. Today we decided to make a tutorial to share. First Peter got some paper and drew a pumpkin shape with eyes nose and mouth. Freezer paper works great but we were out so today we just used ordinary paper.
Then we pinned the paper to some pumpkin colored fabric and sewed around the drawn lines.
Next Peter flipped it over so the fabric side was on top and sewed over all the lines again. He's using a variegated thread from Superior Threads' King Tut range #934 Nile Delta
Now Mom got some sharp pointy sizzors and snipped very carefully around the inside of the sewn lines.
Peter chose some yellow fabric to 'shine through' the holes in the pumpkin.
Here mom is ripping off the paper around the outer edge of the pumpkin. The needle has perforated the paper so it's easy. The rest of the paper we just leave in because it helps the pumkin to hold its shape.
Now put the WRONG side of the yellow fabric against the RIGHT side of the pumpkin. This way when you turn it inside out the right side of the fabric will be shining through the holes and sew around the outside edge. Leave a few inches un-sewn so you can turn it inside out.
Now cut around the sewn pumpkin shape leaving a quarter of an inch, then snip the the curves like an arm hole. Turn it inside out and machine stitch the last bit together.
Friday, 23 October 2009
Texture Magic Tutorial
I've just received a shipment of Texture Magic from Superior Threads and I'm having lots of fun experimenting with it. Texture Magic is a fabric that shrinks 30% when it's steamed. Here's a basic tutorial for using Texture Magic with a sewing machine off the frame. I've chosen a fat quarter of seasonal black cat fat fabric. It has the added bonus of saving me the trouble of drawing a grid.
The Texture Magic packets are 47" X 18" That's half a yard and will fit two fat quarters. So I'll cut off the other half and save it for the next project. Next I''ve pinned the fat quarter to the Texture Magic.
I'm going to sew along the grid lines on the fat quarter.
Here it is, all sewn along the grid lines.
Now, following the directions on the packet, I'm going to steam the Texture Magic side, taking care not to actually touch the fabric.
Now I've turned it round to the fabric side and am steaming it a bit more. WOW! Great texture. And blogging about it took far longer than doing it!!
Monday, 19 October 2009
A Frugal Quilter
Liz Burnes is an amazingly frugal quilter! She and her friends in the Rags to Stitches group salvage 100% cotton shirts and denim jeans from charity shops and car boot sales. This reclaimed fabric is first washed and pressed. Then it all goes to the blade. With the shirts, the first part to go is the back. The back of a large mans shirt yields at least 9 six-inch squares. You can probably guess that big is beautiful, and that the gals are looking for the larger sizes.
These pre-cut squares are sold to quilters looking to achieve the shabby chic of instant vintage. This fabric is so soft and comfortable as only fabric mellowed by many washings over time can be. The sales from the back squares more than cover the cost of the shirts. That means that Liz and her friends are quilting for free as they salvage all they can from the rest of the shirts.
Liz uses the yoke, sleeves and the fronts of the shirts to make squares and strips which she in turn uses to create her own quilts and bags. All the buttons are saved too. My favourite part that Liz salvages from the shirts is the french seam that runs from the cuff to under the arm and then down the sides of the shirts. Liz slices these off, and uses them like pieces of string to tie a bag shut, wrap presents or to tie a bunch of flowers from the garden. In fact the only part of the shirts that Liz hasn't found a use for is the collar. Perhaps that's just as well as with my husband's shirts it's always the collar that wears out first.
Liz has gone back to the Isle of Wight now. But she's left me a great present. I just love the way these 'shirt strings' look hanging from a hook on the beam in my kitchen. They look so pretty that I don't really want to use them. Then again, I suppose I could just make more of my own.
Sunday, 18 October 2009
Workshop Feedback
Liz Burns came up from the Isle of Wight for a machine quilting workshop last week. It was a pleasure to get to know Liz. I'll be blogging more about Liz and her Rags to Stitches Charity project on future posts.
Friday, 16 October 2009
Machine Quiltling Workshops
There are lots of reasons to go on a machine quilting workshop. Sometimes it's all about learning styles. Some people can learn everything they need to know from books or blogs. But others will benefit from a more personal hands on approach.
A new gadget can be daunting. You see it at the show. It looks so easy. So in the heat of the moment you buy the thing. But when you get it home there can be a certain 'quilters block' when it comes to getting it out of the box and starting to quilt with it. A workshop can be just the thing to get over the hump, bridging the gap between watching someone else and confidently doing it yourself.
Sometimes it's just about focus. Our lives are so busy, filled with endless demands on our time and energies. Setting aside time for a workshop, creates a context to focus on just one thing. And focus is powerful. A couple of days away from the daily grind can be refreshing and restorative. And the opportunity to focus on developing a new skill away from the daily distractions can usher us into new levels of proficiency.
I offer personal workshops for one or perhaps two people keen to develop free-motion machine quilting skills using a table top frame. Although I'm using a JUKI TL 98P on the New English Quilter, the lessons can be applied to any sewing machine on any frame. All the materials are provided in a relaxed setting and the workshop is built around you, where you are and what you hope to accomplish.
For people traveling any distance, there is an award winning B&B just across the street. Margaret and David at Chaplin House will make your stay something special. so much so that many people who came to Chaplin House for an initial workshop keep on coming back again and again to just to enjoy the hospitality. http://www.chaplin-house.co.uk/
To arrange a workshop give me a ring or email.
tel:01526 378057 marthamilne@tiscali.co.uk
Tuesday, 6 October 2009
New Adventures
This past Sunday, I took Kate, our oldest daughter off to start her first term reading English at Warrick University. It was a perfect Autumn day with blue skies and lovely light falling on ploughed fields and changing leaves. Waving her off at the window, I thought back on all those first days, from playschool to Primary school, High School and Sixth Form. All the good-byes leading to ever widening circles. Children are amazing creatures - always changing and ever the same! I'm glad I got to see her new flat. Now I can respond to this like every other life changing event and make a quilt.
Subscribe to:
Posts (Atom)